One of society’s modern status symbols is the pen. A... carries a certain amount of prestige and professionalism that nothing,...
advertisement
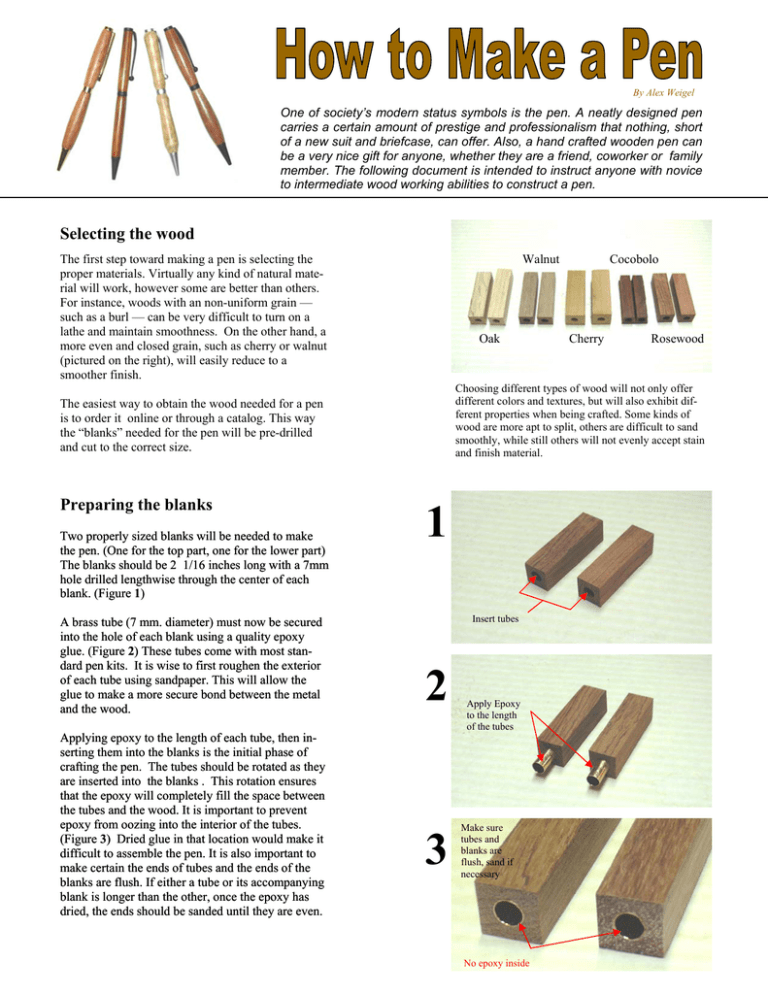
By Alex Weigel One of society’s modern status symbols is the pen. A neatly designed pen carries a certain amount of prestige and professionalism that nothing, short of a new suit and briefcase, can offer. Also, a hand crafted wooden pen can be a very nice gift for anyone, whether they are a friend, coworker or family member. The following document is intended to instruct anyone with novice to intermediate wood working abilities to construct a pen. Selecting the wood The first step toward making a pen is selecting the proper materials. Virtually any kind of natural material will work, however some are better than others. For instance, woods with an non-uniform grain — such as a burl — can be very difficult to turn on a lathe and maintain smoothness. On the other hand, a more even and closed grain, such as cherry or walnut (pictured on the right), will easily reduce to a smoother finish. Walnut Oak Two properly sized blanks will be needed to make the pen. (One for the top part, one for the lower part) The blanks should be 2 1/16 inches long with a 7mm hole drilled lengthwise through the center of each blank. (Figure 1) A brass tube (7 mm. diameter) must now be secured into the hole of each blank using a quality epoxy glue. (Figure 2) These tubes come with most standard pen kits. It is wise to first roughen the exterior of each tube using sandpaper. This will allow the glue to make a more secure bond between the metal and the wood. Applying epoxy to the length of each tube, then inserting them into the blanks is the initial phase of crafting the pen. The tubes should be rotated as they are inserted into the blanks . This rotation ensures that the epoxy will completely fill the space between the tubes and the wood. It is important to prevent epoxy from oozing into the interior of the tubes. (Figure 3) Dried glue in that location would make it difficult to assemble the pen. It is also important to make certain the ends of tubes and the ends of the blanks are flush. If either a tube or its accompanying blank is longer than the other, once the epoxy has dried, the ends should be sanded until they are even. Cherry Rosewood Choosing different types of wood will not only offer different colors and textures, but will also exhibit different properties when being crafted. Some kinds of wood are more apt to split, others are difficult to sand smoothly, while still others will not evenly accept stain and finish material. The easiest way to obtain the wood needed for a pen is to order it online or through a catalog. This way the “blanks” needed for the pen will be pre-drilled and cut to the correct size. Preparing the blanks Cocobolo 1 Insert tubes 2 3 Apply Epoxy to the length of the tubes Make sure tubes and blanks are flush, sand if necessary No epoxy inside Assembling the mandrel Once the tubes are secured in the blanks, it is time to mount them on a wood lathe using a mandrel. The main idea of building a pen is to turn two pieces of wood (blanks) on a lathe so that the wood will be carved in a cylindrically symmetric pattern. However, these pieces of wood are so small that they cannot be secured to the lathe using any ordinary means. Therefore, a device must be used to adapt the wood to the lathe. This device is a mandrel. Shaft Bushings Mandrel Locking nut Screws onto lathe The stock or large end of the mandrel (pictured on the right) has female threads which allows it to be screwed onto the headstock (turning part) of the lathe. The stock reduces to a shaft designed to slide into the tubes of the blanks. The blanks must be rigidly attached to the mandrel. Spacers — better known as bushings — are used to distribute force and allow room to shape both ends of each blank while the lathe is running. A locking nut at the end of the shaft provides enough force through the bushings and the blanks that the rotational forces exerted through the lathe and chisels will be overcome. Thus, the wood will act as though it has been directly secured to the lathe. Preparing the lathe When the mandrel is fully prepared, the next step is to attach it to the lathe. (Figure 1) The stock or head of the mandrel is a threaded female socket 3/4 inch in diameter and has 16 threads per inch (tpi). The female end of the mandrel must be securely screwed onto the male end of the lathe headstock, but does not need to be overly tightened. The turning action of the lathe provides a self-tightening property, therefore wrenches should not be necessary. (Figure 2) Blanks Nut applies pressure to keep blanks from spinning Threads Bushings separate blanks for ease of use 1 Lathe Live tailstock with point insert Headstock Bed Locked tailstock With the head of the mandrel secured, the tail (shaft of the mandrel) must also be attached. The lathe should have a “live tailstock with point insert” attached. The point of the tailstock is then inserted into an indention in the tail of the mandrel. The tail assembly should then be tightened (consult the lathe owner’s manual). (Figure 2) This connection between the mandrel and the lathe should be tight so that the mandrel is rigidly attached, but not so tight that the tail is forced out of alignment. The alignment of the tail and the mandrel must be exactly parallel so that when the lathe turns, the shaft will not move unexpectedly (wobble). After the headstock, mandrel, and tailstock are joined, the tool rest may now be inserted. (Figure 3) This rest gives the lathe operator a static object to stabilize and control the chisels. It is important that this rest be secured to the lathe, and be positioned near the wood. Exact positioning can be varied based on the diameter of the wood stock and comfort of the operator. 2 Mandrel screwed onto the stock Open tailstock Locked tailstock 3 Tool rest provides better control over the chisels Turning the pen After securing the mandrel to the lathe, the next task is to actually turn the wood blanks. Simply turn on the lathe and use the chisels to chip away at the wood. (Figure 1) In the beginning, take a generous amount of wood in your scrapings until the blank has become round. At this point, scraping should become more conservative and careful. (Figure 2) Once the wood has been tooled to the desired shape, use a variety of sandpaper with varying grit to smooth the wood. (Figure 3) Start with rough sandpaper (80—100 grit), and gradually work your way down to a fine grit (600—1200 grit). Fine steel wool can even be used for finishing touches. The goal here is to make an aesthetically pleasing barrel for the pen. By using the lathe and differently shaped chisels there are an infinite number of ways to design a pen. 1 Blanks Chip away excess wood to create the desired shape of the pen Chisel Tool rest Tailstock Exert light pressure and be careful not to dent or split the wood 2 The chisel is supported by the tool rest which provides greater precision Important considerations It is strongly recommended to slowly chip away at the wood. Being too aggressive with the chisel can result in a split blank or may leave dents and scrapes in the wood that are difficult to smooth with sand paper. Rough sand paper can also leave scratches in the wood, making it necessary to use a finer sandpaper for softer wood. Also, attention must be given to the desired diameter of the pen. It can be very difficult to judge how thick the blanks are through mere observation, so using a calipers or other measuring device is recommended. Keep in mind that the bushings on the mandrel have a significant thickness. It is a good approximation to assume that the thickest part of the pen tip, clip, and ring (middle band) are as thick as the mandrel bushings. Therefore, be sure that the ends of the blanks are sanded all the way down to be flush with the bushings. (Be careful not to sand all the wood off the blank.) Headstock Sandpaper 3 Use sandpaper to smooth the wood Tool rest removed for accessibility Lathe tools Spindle gouge There are many different shapes that can be created using a lathe. It is sometimes helpful to picture the pen as a two dimensional cross section. This visual can often act as an aid for chiseling. parting tool skew There are many different shapes and sizes of chisels available. Each shape offers a unique way of chipping the wood. Finishing the wood After the wood has been turned, chiseled, and sanded, the next step is to put a finish on it. There are many ways to finish wood. Stain, varnish, polyurethane, shellac, and paint are just a few of the many ways wood can be finished. Perhaps the quickest and easiest way to accomplish a very professional appearance is using a wax. With the lathe turned off, simply apply a few drops across the surface of the blanks and use a rag to spread the wax evenly across the surface. (Figure 1) Turn the lathe on, and continue to use the rag to spread the wax throughout with wood. Be sure to apply force to the rag by pinching the rag to the turning wood. (Figure 2) This will create a small amount of heat, which is to be expected. However, try to avoid burns, that much force is not necessary. Continue to add wax to the wood in this same manner until the desired gloss is achieved. (Figure 3) For a flat finish, don’t use very much wax, but a glossy finish will require more drops. Shellawax is a finishing compound that quickly finishes your wood 1 Apply wax to both barrels 2 Pinch the rag around the wood to evenly coat the blank and add more compound if needed 3 The pen kit The easiest way to build a pen is to buy a kit. There are a variety of pen styles, sizes, colors, and designs to choose from. Many woodworking and hobbyist catalogs offer such kits. Finished blanks Assembling the barrels 1 Blank Pen tip Pieces of wood acting as a pad Place the barrel of the pen into the vise with the tip of the pen partially inside the barrel. Be sure to have wooden pads on either side of the barrel/ pen tip. This will help avoid damage when you press the pen. 2 Blank End of tip that will be inside barrel Pen tip Using a vise, press the tip of the pen into the blank. The tip should then smoothly connect to the pen barrel. 3 4 Pen mechanism Barrel Mechanism is inserted into the barrel up to the groove Tip Groove Pen tip is flush with the barrel Press the rotating pen mechanism into the barrel. Make sure to only put the mechanism as far as the groove. Assembling the pen Barrel 5 Ring Pen mechanism Ink cartridge Clip Slide the ring onto the pen mechanism, then slide the ink cartridge into the pen barrel and screw it into the pen mechanism. Cap Barrel Ring Pen mechanism Top barrel Blank Slide the top barrel of the pen over the ink cartridge and onto the pen mechanism. Press the cap of the pin into the top of the top blank. Be sure to sandwich the clip between the cap and the blank. Tools needed 1) Lathe (includes live tailstock with point insert and tool rest) 2) Mandrel (complete with 6 bushings and a locking nut) 3) Wood chisels (skew, spindle gouge, parting tool, etc.) 4) Calipers (optional) 5) Sand paper (80-100 grit and 600-1200 grit) 6) Vise Materials needed 1) Wood blanks ( 2 1/16 inches long with a 7mm hole drilled lengthwise through the center ) 2) Epoxy 3) Finishing chemicals (Shellawax, polyurethane, etc.) 4) Pen kit (2 tubes, tip, clip, cap, band, ink cartridge, pen mechanism) Finally, slide the top pen barrel onto the rest of the pen mechanism. The pen is complete. To operate, twist the top of the pen to extend or retract the ink cartridge. Final comments A newly designed, hand-crafted, pen can make an excellent gift for nearly anyone, including friends, family, co-workers or neighbors. To personalize a pen, it can be made from wood that has personal significance for the crafter or the recipient. For example, a pen could be crafted from the remains of a tree from someone's back yard or family farm. Another method of adding individuality is engraving a name or message on the side of the barrel or on the clip. Some pen kit vendors offer special clips and bands to personalize a pen. When crafting small projects, such as a pen, it is very important to carefully monitor both detail and quality. Minor flaws are very noticeable on small objects. It is important to have fun when making pens and try not to treat it as work. Often, the mood of the craftsmen will be visible in the quality of the pen, so remember to take the necessary amount of time to create it.
